Sunday, August 30, 2009

Quick-fix Quesadillas with Guacamole and Tomatillo Salsa

Tired of eating leftovers?? Well if you have any left over meat and or vegetables well then spice up your dinner by making some quesadillas! But quesadillas without Guacamole and salsa is sinful! ENJOY this perfect meal tonight!

Quick-fix Quesadillas

Ingredients:

4-6 6" flour tortillas
Any cooked meat, shredded or small cubes
Any vegetables you desire
1 cup of Monterrey Jack Cheese or Cheddar cheese, you can use both of .5 cup each
.25 cup sour cream
jalapeno peppers, sliced (optional)
Salt if needed, though very little as the cheese is already salty

Directions:

1. In a bowl, combine your meats and or vegetables
2. On a flat surface, spread a little bit of sour cream on half of the tortilla bread.
3. On that same half, add a little bit of the meat and or vegetables, the peppers (optional) and cheese
4. Fold the tortilla in half and gently press. Place on a skillet and turn on heat to medium heat.
5. Cook at medium heat for about 3-4 mins on one side until the cheese starts to melt and quesadilla starts to brown. Turn over and cook for an additional minute. Cut the quesadilla into 4 wedges and repeat procedure for the other tortillas

Serve hot with Sour Cream and the fix-ins down below!
Tip: You can make this quesadilla without meat and it will become a vegetarian dish!


Tomatillo Salsa

Ingredients

1lb of Tomatillos
5 -8 fresh jalapenos, finely chopped and depending on desired heat
.25 cup of fresh cilantro, finely chopped
2 cloves of garlic
salt, to taste
1 squeeze of lime (optional)

Directions:

1.Peel tomatillo husks and rinse in water
2. Grill or roast the tomatillos and jalapenos until the skin appears burnt. Do not peel the skin.
3. In a mixer/food processor/blender, mix the garlic, tomatillos, jalapenos, and process until semi-smooth
4. Sprinkle salt to taste and add the cilantro and blend for another 7-10 seconds.


Guacamole

Ingredients:

3 avacados, ripe
1 lime
1 or 2 cloves garlic, finely minced
1 medium tomato, chopped and seeded
1/2 a small onion, chopped
1 jalapeno, remove seeds and ribs if you want it mild--leave them in if you like it hotter
chopped cilantro
coarse salt

Directions:

1. Get your avocados ready--cut them in half carefully, from top to bottom, whack the pit with your knife, carefully! and twist it out. Take a knife and carefully cut lines vertically and horizontally while the halves are still in the peel. Then run a spoon under and around the flesh and scoop it out. Put the chunks in a medium bowl.

2.Cut the lime in half and squeeze the juice from one half over the avocado.


3. Add the garlic to the bowl and mash it all up some more with a fork

4. Add the tomato and onion and some salt, then cilantro and jalapeno.


5. Cover the surface with plastic wrap and put it in the fridge to let the flavors mingle amongst themselves. About 1/2 an hour or so.

Serve with chips, burritos or quesadillas above
ps. if you want a figure-friendly guacamole, try this one from Weight-watchers.

Photo Credits:

Quesadilla: Santafeburrito.com
Tomatillo Salsa: Photobucket user Domesticpursuits
Guacamole: GroupRecipes.com

Wednesday, August 26, 2009

Haleem

Haleem is a delectable wholesome thick soup-like dish, that is made with both wheat, lentils and meat. This dish can be made with any meat though it usually made with either beef or mutton. It is primarily eaten during Ramadan or in the winter times to keep warm. It is cooked over 7 to 8 hours

Ingredients:

1 lb of wheat grains, crushed and soaked for 2 hrs
3lbs of mutton or beef
1 cup of gram lentils, soaked and boiled
3 Onions, medium sized and thinly sliced
2 tbsp of ginger and garlic past
1 tsp, ground garam masala
2 tbsp of red chilli powder
4 tbsp of corriander powder
1 tsp of turmeric powder
Salt to taste
1.5 cups of oil


Garnish
Fresh corriander leaves, finely chopped
Green chillies, finely chopped
Fried onions, finely chopped
1 tsp of ground garam masala,
lemon, quartered
Ginger, thinly sliced


Procedure:

1. In a pot, combine, meat, oil, garlic, garam masala, red chilli powder, corriander powder, turmeric, salt and cook on medium heat.

2. In a seperate pot, boil, wheat grains with alot of water and salt until the grains become tender and mushy.

3. Mix the wheat grains with meat and continue to cook, stirring continuously until it is well incorporated.

4. Grind the lentils in a food processor made into a thick paste by adding water.

5. Pour the lentil paste in the meat and wheat mixture and continue to stir until it is well mixed. cook on low heat for atleast another 30 -40 mins until meat is tender

6. Fry the sliced onions and sprinkle on top of Haleem when it is done and ready to serve. Garnish with Corriander and garam masala. Serve with the garnishes and hot!

Piyaju vs Beguni

There has always been a debate at our house on which is better? The Piyaju or the Beguni. Deep down, I'm sure we think it's both because no Ramadan day is complete without iftar that doesn't include these both. Beguni is deep fried battered eggplant and Piyaju is sort of the Bengali pakora made with Lentils and onions. They are both friend and are extra crunchy...And ofcourse by no means are they healthy...But come on! We all know that anything unhealthy is very tasty! So here we are sharing these recipes of two iftar delicacies. Of course there are more to come!!

Beguni (Deep fried Eggplant)
Ingredients:
1 large eggplant, thinly sliced
Oil to fry

Batter Recipe:
Besan (aka Gram flour or chickpea flour)
salt to taste
.25 tsp of turmeric powder
.5 tsp of red chilli powder
.5 tsp of cumin powder
.5 tsp of baking powder
salt to taste
water

Procedure:

1. Mix all dry ingredients in a bowl.
2. Slowly add water to make the batter smooth and semi thick consistency.
3. Dip the eggplant and coat in batter
4. fry in oil over medium heat until light golden brown

Serve hot

Piyaju

Ingredients

.5 cup of Masoor Daal (Lentils), soaked for 3-4 hrs in hot water, you can soak overnight as well
1 Onion, thinly sliced
3-5 green chillies, sliced
.25 tsp of turmeric powder
.5 tsp of red chilli powder
.5 tsp of cumin powder
.25 tsp of ginger powder
.25 cup corriander, thinly sliced (optional)
salt to taste
Oil to fry

Procedure:
1. Blend lentils in a blender to make a paste. You made add a little bit of water to make loose.
2. in a bowl, combine all ingredients and let sit for 5 mins
3. Make small flattened balls and fry in oil over medium heat until golden brown
4. Pat on tissue paper and serve hot.


Photo Credits:
Picture of Piyaju was found on wikipedia.com
Picture of Beguni was found on kichukhonn.blogspot.com

Ramadan Kareem

Wishing all our blog readers Ramadan Kareem! May you, your family and friends are blessed this months and the years ahead...

On a brighter note, we will be posting various iftari food recipes...so stay tuned

Thursday, August 13, 2009

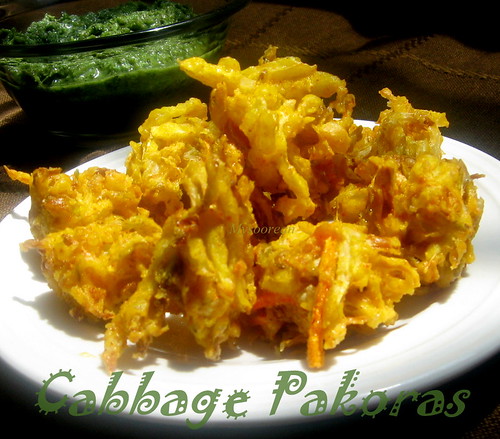
Cabbage Pakoras

Ever since it's been raining, I've been craving cabbage pakoras, but have been too lazy to make it. So I decided to share the recipe so someone can make it for me and send it my way...muahaha

Ingredients

2 cups of cabbage, shredded
1-2 green chillies, chopped fine
1 tbsp sesame seeds (optional)
½ tsp turmeric
½ tsp cayenne (red chilli) powder
~1 ½ cups of besan (gram flour)
a pinch of baking soda
salt
vegetable oil for frying

Directions

1.Using a little water to make a thick batter with the besan, salt and the spices. Mix well to remove lumps.

2. Add the sesame seeds, the green chillies and the shredded cabbage.

3. Heat oil in a wok. The oil should be very hot for frying pakoras. Test with a drop of batter; it should sizzle.

4. Add the pinch of baking soda and a teaspoon of hot oil from the wok to the batter and mix well.

5. Drop spoonfuls of batter into the hot oil and fry till golden all around.

Serve hot with ketchup or with coriander-mint chutney

Photo Credit: Flickr.com - Mysoorean

Tuesday, August 4, 2009

Truvia - The Natural Sweetener

The other day when I was parked on the couch in front of the TV watching the Mentalist, I came across an ad about Truvia, the zero-calorie natural sugar substitute. Surely enough, it got me curious. So naturally I googled it and came across their website to learn more about it. Truvia is a product of the Stevia plant that hails from the sunflower family.

The Truvia website says: Truvia™ natural sweetener is refreshingly uncomplicated. Sprinkle it on your grapefruit. Spoon it in your coffee. It won't end up on your conscience or your thighs. One packet of Truvia™ natural sweetener provides the same sweetness as two teaspoons of sugar.Truvia™ natural sweetener is a great alternative for people with diabetes. It is also kosher certified.

Water. Sunshine. Nutrients from the earth. That's what goes into the stevia plant. Then nature works her magic and creates a wonderfully sweet taste. Next, we steep the leaves, much like making tea, that begins the process of capturing rebiana, the best tasting part of the stevia plant. Ultimately, this little leaf gives back a recipe for sweetness that's both delicious and zero-calorie guilt free.

Now this all sounded good, so I decided to dig a little deeper...Let's see what Wikipedia.com says about what this stevia plant is. Well Wikipedia says, "The species Stevia rebaudiana, commonly known as sweetleaf, sweet leaf, sugarleaf, or simply stevia, is widely grown for its sweet leaves. As a sweetener and sugar substitute, stevia's taste has a slower onset and longer duration than that of sugar, although some of its extracts may have a bitter or licorice-like aftertaste at high concentrations. Medical research has also shown possible benefits of stevia in treating obesity and high blood pressure. Because stevia has a negligible effect on blood glucose, it is attractive as a natural sweetener to people on carbohydrate-controlled diets. However, health and political controversies have limited stevia's availability in many countries; for example, the United States banned it in the early 1990s unless labeled as a supplement. Stevia is widely used as a sweetener in Japan, and it is now available in Canada as a dietary supplement. Rebiana is a trade name for a zero-calorie sweetener containing mainly the steviol glycoside rebaudioside A (Reb-A), which is extracted from stevia."

What I don't seem to understand is that if this plant is soo beneficial, why was it banned back in the early 1990s especially when the US was rapidly becoming the fattest country of the world. Diseases such as diabetes, obesity was soaring like a rocket? Although everything thats been written on it so far has been fine dandy, I know that my cynical mind can not be easily tricked. There is always a good and bad side and I guess We just have to wait until someone does more research on it and I have access to it on the the Internet. Until then, try it and let me know what you think. Anything and Everything is good in moderation!

Enjoy this next picture...

Wednesday, July 29, 2009

Fish with Cauliflower and Tomatoes

Fish, ideally, any less bony fish would work, eg. Tilapia etc..
1 onion, medium sized, thinly sliced
1 tomato, 8 wedges
1-2 cloves of garlic, sliced
.25 tsp of tumeric powder
.5 tsp of red chilli powder
.5 tsp of cumin powder
3-4 green chillies, slivered
coriander leaves to garnish
salt, to taste
oil

First and foremost, it is very important that you wash your fish with salt several times. If the fish smells all your efforts of cooking this or any fish dish is going to go to a waste.

1. In a deep skillet, saute onions and garlic until light golden brown

2. Add spices, salt and green chillies. Continue to fry

3. Add .5 cup of water and simmer

4. Add fish, cauliflower and tomatoes and continue to cook, from time to time keep on adding water so that there is light and thin gravy. Cover and let simmer. move the saucepan around instead of stirring so that the fish does not break.

5. Once the cauliflower is soft and fish is done sprinkle with a little more of cumin and garnish with coriander and serve.

Kasadela

The hiatus has been broken...and it's Kasadela's fault. Though the review I'm about to share with you about this restaurant is surely going to prove that it is all positive! It was yet another dear friend's birthday this past weekend so it was surely in order to look for a new restaurant to try. Only this time, the recession had caught up on most of us and therefore were secretly looking for a cheaper restaurant than the norm we would go to. Using my powerful fingers, I typed away menupages.com and was out on the search of a lifetime...finding a restaurant is a daunting task especially when you don't really know if the restaurant is going to be a hit or a miss...Do these restaurant goers share the same taste buds as you etc..? So anyway, I looked at the menu, prices looked decent, checked google maps, looked decent and the best part of it all was that it was right around the corner from the place we were going to be to PARTAYYY!! And what great way to start the night with Japanese Tapas and Sake from a proper Sake House?

Anyways, I booked the table for 3 at 10:30 and sent out the emails about the dinner rendez-vous! As I strolled in at 1030 (yes ON TIME) it was bopping!! Everyone was super nice and recommended me a unique plum sake as I waited for my friends who were all LATE!! Having 30 mins to check the menu, I took the liberty to order for the table which turned out to be a bigger party than just the 3 of us.

We started off with the Rock Shrimp Tempura with Creamy Spice Sauce (below on your left). As yummy as it sounds, it tasted even better. It was served with some mixed greens that were douced in a ponzou dressing that cut the heaviness with its clean flavors!


Subsequently, this mouth-watering dish had arrived...Beef Tataki with Green Apple and Watercress. Seared tenderloin beef served cold w/ spicy ponzu sauce. (Note to self: need to learn how to cook with ponzu--it is soo YUMMY). We all devoured it in seconds... The Squid and Scallion Pancake and the Grilled Chicken w/ spicy den miso on a bed of yuzu soy marinated vegetables were equally yummy. Initially when we ordered the Grilled Chicken, I figured that it would be a healthy dish but when you taste it, you can taste full of flavor and juicy from the fat. So far every dish that was coming out of this restaurant's kitchen was hitting every spot of our taste buds. But the dish that took the icing on our cakes was the Tebasaki, Japanese style chicken wings (on your left). It was crispy, sweet, salty, spicy and most importantly bursting flavors of garlic. If you ever go on a date, do not order this if you plan to kiss your date later on. But if you can convince your date to share this dish, it is worth it for every penny and more!!

So all in all, Kasadella was an absolutely amazing find!! So for those of you who can't pour all you bags of change at Nobu, fear no more! Because the biggest surprise of it all is that former chef of Nobu, Yujen Pan has opened this izakaya, in definition means "a simple tavern where customers eat and drink at small expense in a cheerful atmosphere." which it is to the T!!! So for those of you who are in NEW YORK CITY, do not miss out on this restaurant!!! Coz we surely are going to go back!


Photo Credits: www.officiallynana.com and Jui

Monday, March 9, 2009

Cooking Time Dilemma

Ever got confused how long you need to cook a certain type of meat, or what temperature is it supposed to be for the meat to be Well Done or Well Rare!?! (I know well Rare doesn't exist and that it's just rare but whatever!!!)

So I was doing some research on it and well the best site that I found that talked about it was at Recepetips.com It's quite extensive and should clear up all your questions. Perfect tool I tell you! For those of you who cant click on the link here is the actual address: http://www.recipetips.com/kitchen-tips/t-129-/cooking-temperature-and-time.asp

So for those of you cooks out there who is looking for some great tips and well a perfect steak whether it be of meat or fish click away...But just don't forget to come visit us for some of our recipes.

ENJOY...and until next time!

Spinach Florentine Stuffed Salmon with Roasted Red Potatoes and Sauteed Brussel Sprouts Under A Creamy White Sauce

Ingredients:
Serves 2

1 pkg (2 per pkg) Spinach Florentine Stuffed Salmon patties, available at Trader Joe's ® (For those who do not have access to a TJ's, a similar recipe will be posted in the next few days)

For the Potatoes
2-3 small red potatoes per person, quartered
1/4 cup of parsley, coarsely chopped
salt, to taste
pepper, to taste
1/2 tsp of lemon-pepper seasoning
a pinch of cayenne pepper
a pinch of garlic powder
1/2 tbsp of canola oil

For the Brussels Sprouts
1 pkg of Brussels Sprouts
1/2 large onion, sliced
1 tbsp of butter
1-2 cloves of garlic
1 tsp of lemon pepper seasoning
salt, to taste
pepper, to taste

For the Sauce
1/2 cup of milk
1 tsp of flour
1tbsp of butter
1 slice of American cheese (optional)
salt, to taste
pepper, to taste
pinch of garlic
a little less than 1/4 cup of parsley, coarsely chopped

Directions:

For the Potatoes


1. Preheat oven 375°F and line baking pan with foil
2. In a mixing bowl, mix all ingredients until potatoes are entirely coated with the spices
3. Bake potatoes for 20 -30 mins until fork tender.
4. Ready to serve

For the Brussels Sprouts (total cook time: approx 10 - 15 mins)

1. In medium heat, saute onions and garlic in butter until softened
2. Add Brussels Sprouts
3. Season with the salt, pepper, lemon pepper seasoning
4. Cook until Brussels Sprouts are soft
5. Ready to serve

For the Sauce

1. In a saucepan, medium low heat, simmer milk
2. In a bowl mix the butter and flour and add to milk. Whisk
3. add salt, pepper and cheese(optional) and continue whisking
4. Add parsley. Sauce will thicken and pour in gravy dish or over the meal as shown in the pic above.

For the fish, follow directions as is. Plate as shown above and is ready to eat...

Garnish with parsley and sliced Red Bell Peppers on the side.

Tidbit: The Brussels Sprouts and Roasted Red Potatoes can be a great side dish to any entree you are making!


Tuesday, March 3, 2009

Sweet and Spicy Lemongrass Shrimp with Green Beans

I totally made this recipe up and everyone loved it...my first attempt of using Lemongrass.

This recipe is for 1-1.5 lbs of shrimp

Step 1: Make the Marinade and marinate shrimp for an hr or so.

1 tsp of Thai sweet chili sauce
1 tsp of oyster sauce
2 tsps of soy sauce
2 light squirts of Sriracha hot sauce
1.5 tsps of lemongrass paste (readily available in the herb section of your grocery)
.5 tsp of garlic powder
.25 tsp of ginger powder
salt, to taste
pepper, to taste

Step 2: Make the sauce

Repeat all the ingredients above and add .25 tsp of rice wine vinegar. and let sit

Step 3: Make the Green Beans (aka Haricot Verts)

1.5 pounds green beans, trimmed of stem end

Fill a large high sided skillet with some water adding enough to be just shy of the of the pan by about 1 inch.

Place over high heat and bring up to a boil

Add a pinch of salt and the green beans

Cool for about 5 minutes, the beans should be still crisp.

Drain the beans and then shock them in a bowl of ice cold water and ice to stop from cooking.

Reserve the beans while you start the shrimp.

Step 4: Putting it all together.

In a hot skillet or wok, heat up a tbsp of oil and fry the shrimp for 1 to 2 mins per side. until pink. keep aside.

In the same skillet and left over oil at medium high heat, add 4 thin slices of fresh ginger, sliced scallions or quartered onions if you don't have scallions at home. Cook for a 30 seconds

Add sauce previously made.

Add 1 tsp of corn starch (diluted in cold water)

continue to heat, sauce will thicken. Add more water to make more gravy

Add shrimp and Green beans.

Cook for a minute or 2 and is ready to serve with Rice.

Tip: Can serve with Fried Rice

The New Ingredients In My Kitchen

Hi fellow food lovers....


I know it's been a long while since one of us has posted so I thought I would take the time to post one...So recently after having traveled to certain parts of Asia, I've been cooking a lot with Lemongrass and Merguez Spice mix; Two ingredients from different parts of Asia.

Lemongrass, also called Cochin Grass or Malabar Grass, native in India but is predominantly used in Burmese and Thai dishes. It has a citrus flavor which can be dried and powdered, or used fresh. The trick to using this ingredient is that you should use the bulb at the bottom of the lemongrass then peel and bruise it with a large kitchen knife. You can steep it to make a sauce or use in a stir-fry or make a lemon grass tea. Lemon grass is commonly used in teas, soups, and curries. It is also suitable for poultry, fish, and seafood.


Originally Merguez know as a sausage that originated in the North African region. It is usually made with lamb or beef. Its specific spices flavor the meat as tarty, spicy and red in color. It is popular in France, Morocco, Israel, Belgium, The Netherlands and the German state of Saarland. Down below is the list and measurements of ingredients that make up this spice blend. It is a great spice mix for when making lamb roasts, tagines, kabobs and sausages.

Merguez Spice Blend

1 part Cumin

1/4 part turmeric

1/8 part caraway

1/6 coriander

1/16 fennel

1/8 dried thyme (zaatar)

¼ sumac

1/4 sweet paprika

1/8 ancho chile powder

1/4 cayenne

1/32 black pepper

1/32 white pepper

1/32 pink pepper

Soon I will post recipes using these ingredients.

Thursday, November 27, 2008

Gobble Gobble: Tackling the Bird!

So every year just around Thanksgiving time, we get ambitious and decide that we are going to cook the whole Thanksgiving dinner shebang...but then when the actual time comes around, that same ambition is nowhere to be found and we leave it to my aunt and we gobble out there...But this time around, with much gumption, we decided that once the thanksgiving rounds were over, I would cook the entire thanksgiving dinner as a test run. Basically, it was our way of having proper turkey at Thanksgiving and do experiments at a later time...Only because we don't want to look like the woman on the right.

So what is this blog post all about? Well it's for those who are starting to muster gumption to roast the bird for the very first time...Call it a small guide on what to do when cooking turkey, if you will...so instead of going to all the random sites, we at KD decided to bring it all in one go. Yes...ONE PRINTOUT FROM ONE PAGE...

An Ideal Thanksgiving Turkey should look like this...


So with that in mind let's begin...

Without getting too ahead of ourselves....Let's discuss first things first... The tools we need!!

Roasting Pan
Roasting Rack (to place the bird in the pan)
Poultry Lifters
Meat Baster
Meat Thermometer
Carving Knife and Fork
5 gallon bucket for the brining process
White Cotton String (aka kitchen twine)


STEP 1: THAWING THE TURKEY

Thawing a bird in the refrigerator can take days and in all honesty, who is that patient. So after surveying different processes, I found this to be the most convenient..

COLD WATER THAWING

Allow about 30 minutes per pound.

First be sure the turkey is in a leak-proof plastic bag to prevent cross-contamination and to prevent the turkey from absorbing water, resulting in a watery product.

Submerge the wrapped turkey in cold tap water. Change the water every 30 minutes until the turkey is thawed. Cook the turkey immediately after it is thawed.

Cold Water Thawing Times
  • 4 to 12 pounds …… 2 to 6 hours
  • 12 to 16 pounds …… 6 to 8 hours
  • 16 to 20 pounds …… 8 to 10 hours
  • 20 to 24 pounds …… 10 to 12 hours

A turkey thawed by the cold water method should be cooked immediately. After cooking, meat from the turkey can be refrozen.


STEP 2: BRINING THE TURKEY

The biggest misconception of making turkey juicy and flavorful is by basting the turkey often...In reality, it's when you brine the meat, it adds moisture and flavor and helps to keep it from drying out. So how do we brine a turkey. Well, first the turkey has to be thoroughly thawed and cleaned out, which at this point you should have done based on step 1.

Preparing the Brine (based on a 14-16 lbs turkey)

Ingredients:
1 cup kosher salt
1/2 cup light brown sugar
1 gallon vegetable stock
1 tablespoon black peppercorns
1/2 tablespoon allspice berries
1/2 tablespoon candied ginger
1 gallon iced water
1/2 gallon of cold apple juice

Combine all brine ingredients, except ice water and apple juice, in a stockpot, and bring to a boil. Stir to dissolve solids, then remove from heat, cool to room temperature, and refrigerate until thoroughly chilled.

Early on the day of cooking, (or late the night before) combine the brine, apple juice and ice water in a clean 5-gallon bucket. Place thawed turkey breast side down in brine, cover, and refrigerate or set in cool area (like a basement) for 6 hours. Turn turkey over once, half way through brining.

When you are ready to start cooking your turkey, remove it from the brine and rinse it off thoroughly in the sink with cold water until all traces of salt are off the surface inside and out. Pat the Turkey dry with paper towels. Safely discard the brine and cook your turkey as normal.

Important Tips:

- One way of telling if you have enough salt in your brine is that a raw egg will float in it.
- The turkey should sit in the brine for about 1 hour per pound of turkey. Brining too long is much worse than not brining enough so watch the time.

STEP 3: SEASONING THE TURKEY

Now I'm sure we all have our own recipes and/or we can go on Epicurious.com or Foodnetwork.com and get the perfect recipe to your own liking. The most important thing about this part of the process is that you really need to season the turkey well....ample butter, salt and pepper on the bird. But ample salt and pepper inside the cavity too!!! You might want to stuff the bird with ur favorite stuffing, or rice, different herbs (i.e. rosemary, sage, thyme, and etc.), a lemon or 2, whole garlic, the list is endless but do try to stuff the turkey with something...it acts as an aromatic and gives some flavor to the bird too but of course it is optional..... Once you have stuffed the bird, we then come to the next step of tying the turkey. (p.s. if you stuff the turkey, cook the bird immediately as it may develop harmful bacteria.)

STEP 4: TYING THE TURKEY

Make sure the stuffing is well-secured; put a piece of bread or foil over the neck and body cavity openings and secure the turkey skin over the cavity with skewers, if you have them.

Use kitchen string to tie the turkey's legs together, pressing the legs close to the turkey body. Turn the turkey over and fold its wings back behind it. Tie another piece of string around the turkey's neck skin, leaving two long ends hanging. Pass each string end through a wing. Tie the string ends together, pinning the turkey wings horizontally.

Now that you've tied the turkey it's time to cook!!!

STEP 5: COOKING THE BIRD!!!!

Preheat the oven to 500 F.

Place the turkey breast side down on the rack in the roasting pan. for about 30 mins.

Reduce oven heat to 325 F. It is important to keep the oven door closed as much as possible while the turkey is roasting to maintain a constant temperature within the oven.

Take out turkey and turn breast side up. Insert a meat thermometer at the thickest part of the bird to check the proper doneness of the bird, which is at least 170°F for the breast and 180°F for the thigh. Basting the bird every 1.5 hr will give the bird a crisp golden skin however basting should be kept to a minimum so that the oven door is not opened too often. The more times the oven door is opened, the longer the cooking time will be because of heat loss within the oven.

Turkey Cook Time:

Roasting Times for a Whole Turkey Cooked in a 325°F Conventional Oven
Weight Unstuffed Stuffed
8 to 12 pounds 2¾ to 3 hours 3 to 3½ hours
12 to 14 pounds 3 to 3¾ hours 3½ to 4 hours
14 to 18 pounds 3¾ to 4¼ hours 4 to 4¼ hours
18 to 20 pounds 4¼ to 4½ hours 4¼ to 4¾ hours
20 to 24 pounds 4½ to 5 hours 4¾ to 5¼ hours
24 to 30 pounds 5 to 5¼ hours 5¼ to 6¼ hours


It is important that the turkey is not overcooked, because the breast meat may dry out quickly. Roughly it is 20 mins for every pound...

After removing the turkey from the oven, the temperature of the meat will increase by about 5° as the turkey rests. Let the turkey rest for about 20 - 30 mins under tented foil to allow the juices to go back into the meat.


STEP 6: MAKING THE GRAVY

First take the turkey drippings from the roasting pan and separate the fat, stock depending on how much gravy you want, and meat juices as both will be needed in different stages of the gravy making process.

Deglaze the pan with some wine and meat juice. in a separate bowl mix the turkey fat and a little bit of butter and flour. once mixed, whisk into the mixture in pan.

sauce will thicken. cook until desired consistency... pour into gravy boat and serve with turkey and other fixins...look down below for some ideas!


Bon Apetit!


---------------------------------------------------------------------------------------
The pictures on this post were found in the respective sites
1.
http://www.hornblowerholidays.com/images/big/thanksgiving.jpg
2.
http://www.fotosearch.com
3.
www.countryliving.com

Tuesday, September 2, 2008

Private Practice's Sinful Chocolate Cake Recipes

Holy Mother of Chocolate Cake

Layers:

3 ounces semisweet chocolate

1 1/2 cups hot brewed coffee

3 cups sugar

2 1/2 cups all-purpose flour

1 1/2 cups unsweetened cocoa powder

2 teaspoons baking soda

3/4 teaspoon baking powder

1 1/4 teaspoons salt

3 large eggs

3/4 cup vegetable oil

1 1/2 cups buttermilk

3/4 teaspoon vanilla

Frosting:

1 pound semisweet chocolate

1 cup heavy cream

2 tablespoons sugar

2 tablespoons light corn syrup

1/4 cup unsalted butter

You’ll need:

Two 10- by 2-inch round cake pans

Wax paper

Electric Mixer

A good attitude

For the layers:

Preheat oven to 300°F. Grease those pans. My grandmother lines the pan bottoms with wax paper, too. Finely chop the chocolate. Then, in a bowl, mix the chocolate with the hot coffee. Stir until smooth.

In a large bowl, sift together the sugar, flour, cocoa powder, baking soda, baking powder, and salt. In another large bowl, beat the eggs for about 3 minutes. An electric mixer works best. Then, slowly add the oil, buttermilk, vanilla, and melted chocolate mixture to the eggs, beating until it’s all combined really well. Add the sugar mixture and beat (on medium speed). Finally, divide the batter between your pans and bake them in the middle of your oven for about 65 minutes.

When that’s done and your kitchen is smelling really, really good – Cool the layers completely in their pans. Run a thin knife around the edges of pans and invert the layers. Carefully remove the wax paper and cool the layers completely.

For the frosting:

Finely chop the chocolate. In a saucepan, bring the cream, sugar, and corn syrup to a boil over moderately low heat, whisking until the sugar is dissolved. Remove the pan from the heat and add the chocolate, whisking it until it’s all melted. Now would be the time to whisk in that butter until smooth. Put the frosting in a bowl and allow to cool, stirring occasionally.

Then, spread the frosting between your cake layers, over the top and around the sides. Now, find a fertility specialist and give her what she wants.

Insanely Chocolate Chocolate Chip Cake

For this one, you can opt to use the same frosting from my grandma’s Holy Mother of Chocolate Cake. This cake also works pretty well without any frosting at all. It’s up to you.

2 cups flour

1 1/2 cups sugar

2 teaspoons baking powder

1 teaspoon baking soda

1/2 teaspoon salt

1 1/4 cups sour cream

3/4 cup butter, softened

1 teaspoon vanilla

3 eggs

1/2 cup sugar

1 teaspoon cinnamon

1 (6 ounce) package chocolate chips (I like the mini kind)

Heat your oven to 350 degrees. Grease a 13 x 9 pan. In a large bowl, combine the flour, sugar, baking powder, baking soda, salt, sour cream, butter, vanilla and eggs. Mix all of that goodness together. You can use a mixer at medium speed for about 3 minutes.

Then, pour half of the batter into your pan. In a separate small bowl, combine the sugar and cinnamon. Sprinkle half of that sugar mixture and ½ cup of your chocolate chips over the batter. Repeat with the remaining batter, sugar mixture, and chocolate chips. Bake it all at 350 degrees for 30-35 minutes.

If you want to add the frosting from my previous recipe, you can do so now. If not, no worries. Baking cakes at people is fun, isn’t it?

Give Them What They Want Double Fudge Cake

Again, you don’t have to use frosting on this cake if you don’t want to. If you do, use the frosting from my first recipe.

6 ounces semisweet chocolate

3/4 cup butter

1 cup sugar

4 eggs

1 cup cocoa powder (not drink mix)

1 teaspoon finely ground black pepper

1 pinch salt

Preheat oven to 350° F. Prepare an 8 inch round pan by greasing its bottom and sides. Cut a circle of waxed paper and fit it around the bottom of the pan. Grease that, too.

Coarsely chop your chocolate. Then, melt the chocolate and the butter over simmering water. Stir the sugar into the chocolate. Beat the eggs (fast and hard), one at a time, into the chocolate. Next, add your cocoa, pepper, salt, and stir. Pour the batter into your prepared pan and bake about 40 minutes.

Cool about 10 or 15 minutes. Then run a knife around the edge to loosen, and invert on a plate.